|
 The next zone will be for skin tones. All areas of exposed skin will be selected. As is the case for all the other examples in this tutorial, Photoshop's quick mask function was used to isolate the selection area. It is important to be accurate in making your selections, (especially for critical areas of the photo, like the main subjects) so that color dose not spill over from one section to the next giving the photo a sloppy appearance. For this photo there is an exception to this rule, and that is the area where skin meets hair. It is not essential to be too accurate here since the black areas, like the hair will have a zone to themselves and will be corrected later. The area where hair and skin interfaces is not sharply defined since there are lose strands present. The advantage of using quick mask is you can use a soft edged brush to paint in the selection the give these types of areas a more natural interface. In this case, when selecting the skin, it is best to choose too much than not enough since the hair will be done latter and corrections can then be made at that time. The next zone will be for skin tones. All areas of exposed skin will be selected. As is the case for all the other examples in this tutorial, Photoshop's quick mask function was used to isolate the selection area. It is important to be accurate in making your selections, (especially for critical areas of the photo, like the main subjects) so that color dose not spill over from one section to the next giving the photo a sloppy appearance. For this photo there is an exception to this rule, and that is the area where skin meets hair. It is not essential to be too accurate here since the black areas, like the hair will have a zone to themselves and will be corrected later. The area where hair and skin interfaces is not sharply defined since there are lose strands present. The advantage of using quick mask is you can use a soft edged brush to paint in the selection the give these types of areas a more natural interface. In this case, when selecting the skin, it is best to choose too much than not enough since the hair will be done latter and corrections can then be made at that time.
|
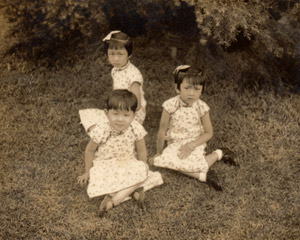
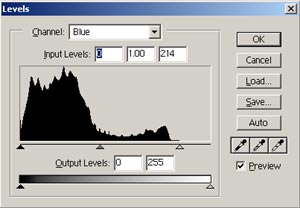 The photo above was taken from the tutorial on dust and scratch removal, and has been cleaned of imperfections and is ready for colorization or any other manipulation. The first step is the make an approximate overall correction to the levels. The photo has a yellow color cast present and this will be remedied by properly setting the levels for individual channels. The blue channel is shown to the left. The right hand (white point) slider below the histogram has been moved left to where the information starts. Often properly setting the levels controls for each of the three channels (red, green, blue) is sufficient to correct a color cast problem. The middle slider (gamma setting) can also be adjusted at this time if the photo is too light or dark. In this case adjusting gamma was not required and only the blue channel was changed.
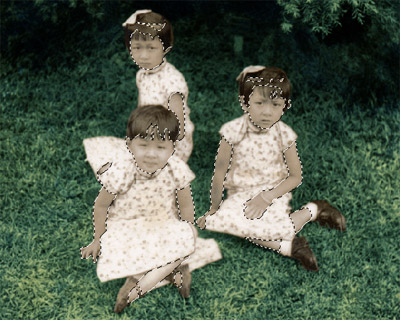
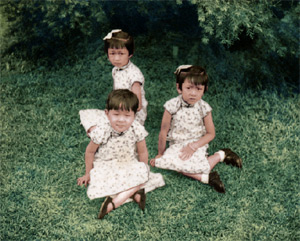
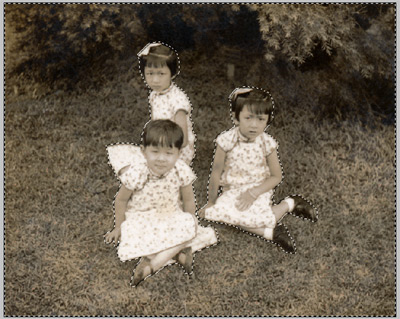 To the left is the image after levels corrections to remove the yellow cast and brighten the image an appropriate amount. As stated above, this was accomplished without changes to gamma, though gamma adjustment is sometimes necessary and will, in fact be used latter in the tutorial. The increased brightness also makes the image easier to work with in the subsequent steps. As mentioned before, the photo will be divided into four zones for the purposes of colorization. The first zone will be the grass and trees - everything except the three girls. A dotted line represents that selected area. As with many functions in Photoshop there is more than one way to make a selection. I generally use quick mask, but the pen tool can also be used to make a clipping path.
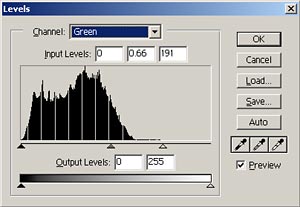 Once the selection of the desired area been made, a new levels adjustment layer can be created. The layer is created based on the selected area so that only the selected area will be affected by the levels adjustment. When examining the histogram for zone 1 we see that there is no information in the upper color areas. Moving the white point slider to the left will produce an improvement in image quality while shifting the gamma setting to the right will offset the increased brightness resulting from the new white point. By setting these values for each channel a shift in color balance can be achieved by favoring one of the channels over another. The green channel is displayed here, and its values are set so that an overall shift toward green is the result. The other channels are then adjusted to fine tune the color to create a natural shade and intensity.
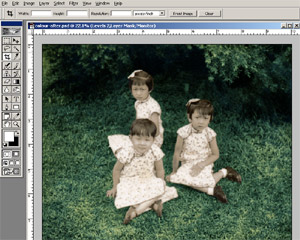 The results of the above levels correction to zone 1 create a green coloration in the grass and foliage area of this image. Try to get the color as close as possible to a natural value, but more fine tuning can be done latter if needed; Again the advantage of performing adjustments on a separate layer is that the changes can be easily deleted or modified without affecting the original image; also, without the advent of Photoshop's layers, any further readjustment would result in a further degradation of image quality. A good analogy would be the way in which a JPEG image is degraded when it is opened and saved on multiple occasions.
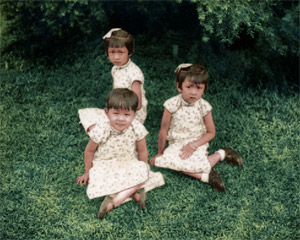 Skin tones are always difficult to get exactly right. Again, a levels correction was made as in the previous example with the grass and trees. All three channels were adjusted to produce the closes match. It may be useful to have a color photo ready for direct comparison in the matching process but be sure that the subject of the example photo has the same skin type as person in the image you are attempting to colorize.
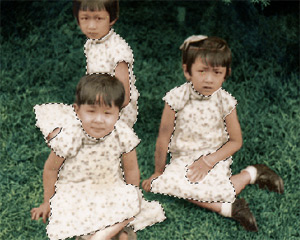 The third zone to be edited is the clothing. Since no one seemed to remember what color the dresses originally were, I elected to make them white as this was the choice involving the least amount of adjustment. It would not be difficult, however, to have tinted the dresses to a light color if that were the desired result. A simple levels correction for white point was done to brighten the whites and improve contrast. This was the easiest of the three zones as no precise color adjustments were required.
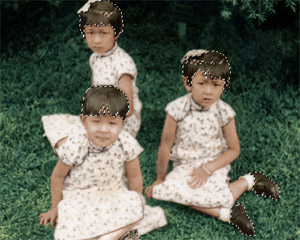 The last of the four main zones included the hair and shoes, which were all supposed to be black but had a dingy faded appearance. A levels adjustment layer was applied to the selected areas in the image to the left, and this time, black point was set. When compared to the corrected image below, the extent of fading present in the original is plainly observable.
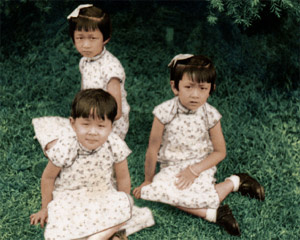 Corrected black point for hair and shoes. By using levels instead of a black paint brush, it is possible to maintain the glossy highlight areas in the hair. This results in a much more authentic appearance that the flat black that would be achieved with the paint brush alone. The paint brush was used in a couple of places, like to remove mud from the shoes (the clone brush could also have been used in this instance).