One of the most tedious yet important operations in image editing is the removal of unwanted blemishes from a photo. These defects are most often caused by dust on the originals, or on the optical surface of the scanner which was used to digitalize them. Other damage to the original in the form of scratches, creases or stains also may require repair, and as long as these defects are not serious, they can easily be masked using the cloning tool in Photoshop.
The presence of dust may not seem like a serious problem, and on a casual inspection of the digital image at lower magnifications, it may not even visible, however, during subsequent steps in the manipulation process it will become increasingly apparent and will have a serious detrimental effect on the finished image if it is not first dealt with. The main problem with small blemishes and dust specs is that once unsharp masking (image sharpening) is applied in the final steps of preparing a photo for printing, all defects will be greatly magnified. If an image has an abundance of small specs, these will result in a grainy appearance after unsharp masking is applied. This is especially true for older, or enlarged photos which were not particularly sharp and may require more aggressive unsharp masking. It is therefore, necessary to eliminate defects from an image before continuing with other aspects of image manipulation.

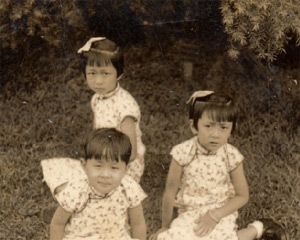 The image to the left is a good example as it suffers from several types of defects such as dust specs, surface scratches, creases, and discolorations. The defects are do not appear excessive at low magnification, but are readily visible when zoomed in, and this is how they are best tackled. The magnification you choose to work at depends on the size of your image and how large you intend to print it; Obviously you do not want any defects to show up on your final print, but keep in mind the effects that unsharp mask will have. When your work window is zoomed in on a small area of the photo, it is easy to lose your place. If you slide your work window along the photo in an ordered manner, finishing one row before staring another, slightly overlapping the previous pass you will avoid missing areas of the image, which would certainly happen if a more haphazard approach was employed.
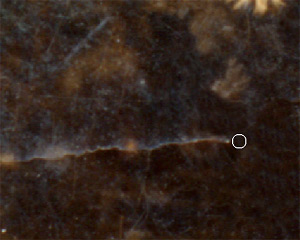 Using the cloning too, Defects can quite easily be removed. The circle (brush) in the image to the left represents the area of effect. The clone tool will replace the area within the circle with pixels taken from a sample area that is specified by the user. This can be done in two ways in Photoshop. The sampling location can be fixed, so that as the clone tool moves it will continue to take samples from that same area. This can be useful if , for example, you need to replace a damaged region with a uniform color, like the dark regions in this image. A sample could be taken from a relatively clean area and used to cover defects where the background has the same appearance as the sample region. The other sampling method is the aligned sampling feature of the clone tool. With this option selected, the sampling region will remain a fixed position and distance from the cloning brush as it moves. This feature is very useful when trying to maintain the integrity of patterns in the background and can even be used to duplicate objects. The type of alignment used will depend on the particular operation but generally the aligned option is more versatile and can produce more natural results since backgrounds are rarely uniform in pattern, color or brightness. In the example image a crease is in the process of being removed. When using the clone too it is important to sample for areas that will make the repair as invisible as possible. The following are some tips which will help to yield the best results:
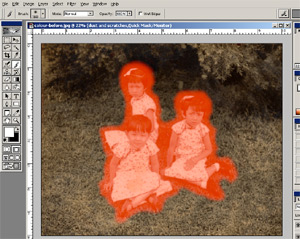 In the example image to the left, a selection has been made using the 'quick mask' feature of Photoshop This feature allows you to paint in an area (red in this example) in the quick mask mode so that painted area can be used as a selection. The three girls are painted 'masked' so that changes made to the photo will only apply to the 'unmasked' or unselected region (the grass and trees). By doing this we can apply Photoshop's dust and scratch filter selectively to only one portion of the photo. This is extremely important since the dust and scratch filter will have a blurring effect. It should only be used on areas of a photo that are already blurred, like an out of focus background, or on areas with little detail where the blurring effect will not be pronounced, such as shadowed areas. Since these areas make up the majority of the photo, the filter can be used to remove dust instead of the using the cloning tool, thus saving a great deal of effort. The effect may even serve to enhance the photo since the blurring will increase the appearance of an out of focus background and so emphasize the main subjects. The main subjects are of course masked because blurring would be highly undesirable, so in these critical areas we must resort to manual dust removal with the cloning tool to maintain maximum detail and preserve quality.
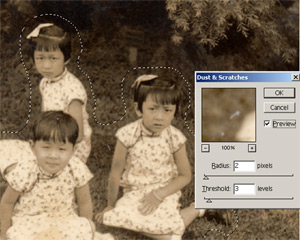 After exiting from quick mask mode, the dotted line or 'marching ants' as they are sometimes called, will become visible and represent the selected area (in this case everything except the three girls and a small zone around them). The dust and scratches filter has two variables as can be seen in the screen shot to the left. The first variable is radius, which indicates the magnitude of the area of effect around a target dust particle. The higher the number, the more effective the dust removal will be but also a greater the amount of blurring will be introduced. The second variable is threshold and this controls how selective the software will be in searching for dust or scratches A higher threshold setting will produce less blurring but will miss some of dust as well. The settings used will depend on the photo in question and some trial and error will be required. Generally it is best to be subtle and not to over do it. The preview check box allows the effects of the filter to be toggled on and off. This helps in the evaluation process.
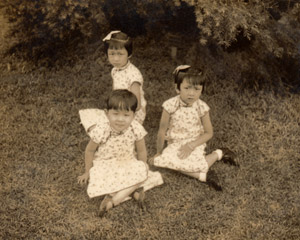 The dust and scratch filter can certainly save a lot of labor, however, there is one caveat to be aware of - the filter can only do so much. The worst offending scratches and damage will not be eliminated, only blurred. The filter works best on small dust and minute scratches were conservative settings can be used so as not to create excessive blurring. It is best to quickly go over the photo first to eliminate the worst damage with the cloning tool before applying the dust and scratch filter. The image to the left shows the photo after manual dust removal and the selective application of the dust and scratch filter. The photo is now ready for subsequent manipulations.