light and shadow photography

Photoshop Levels Correction:
Articles and tutorials on photographic technique and digital imaging editing.


plant photo
home photo galleries articles and tutorials reviews photo links contach
all articles

Levels Corrections:

Photoshop allows users to modify the levels settings for each of the three color channels (red, green, blue) individually. This offers a great deal of flexibility in the control over color.

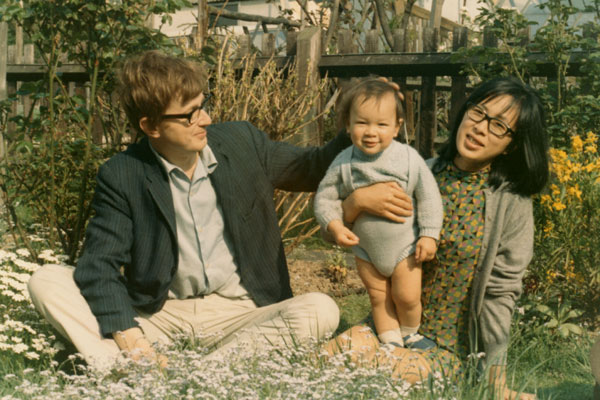
original faded photoThis photo of me and my parents has faded somewhat, resulting in an image with poor contrast and a greenish-yellow color cast. Both these problems may be corrected with the levels function of Photoshop. Gamma can be adjusted at the same time, resulting in an overall increase or decrease in brightness. As is the case with most Photoshop manipulations, it is advisable to perform the levels correction on a separate layer so the effect can easily be altered in the future, or removed completely and redone as required.

photoshop levels redAn 8 bit grey scale image can support 256 (2^8) shades of grey, with a minimum value of zero (black point), and a maximum value of 255 (white point); so the horizontal axis of the histogram shows the 256 graduations in shades of grey from the left, being absolute black, to the right, being complete white. The vertical axis shows the abundance of pixels contained in the image for each of the 256 values. When dealing with a color image, we have three channels of information, one for each color; hence 8 bits multiplied by three channels yields the 24 bit color image we are accustomed to dealing with. When the levels adjustment is applied, a dialog box opens as shown.

The color channels can be individually selected (red is shown here) and modified, or alternatively, all three color channels can be selected at once in RBG mode. Below the histogram are three triangular sliders. The left slider sets black point and the right sets white point. In the red channel histogram shown here, the color information takes up must of the horizontal axis so not much modification is necessary. If only a portion of the horizontal axis contains color information, then space is being wasted and the resulting image will have poor contrast. This is because not all of the 256 available graduations are being utilized. In such a case it is advisable to reposition the sliders for the black and white points, till they are set so that they boarder the actual pixel information and omit areas at both extremes of the scale which contain no information. For the red channel, the while point slider was moved slightly to the left. A new value of 244 can be seen in the highlighted box for white point above the histogram.

The information will be recalculated so that it is distributed across the entire spectrum to take full advantage of the available 256 graduations in shade. Black point was likewise moved slightly to the right to a new value of three. The middle slider controls gamma. This changes the overall brightness and was not moved from is value of 1.00.

photoshop levels greenThe green channel required more adjustment than the red. New values for both black and white points were set but again, gamma was left unaltered. Note that although gamma was unchanged for the green channel, resetting the black point will cause the image to darken while altering white point will increase the lightness of the image. Gamma can be used to compensate for this as needed since an increase or decrease in brightness in only one channel can result in a color shift in the image. This however, is one of the goals we are attempting to achieve in adjusting the levels of this photograph, so gamma was left untouched.

photoshop levels blueIn observing the green channel, we can see most of the reason for the observed yellow color shift in the original image. Blue highlights have faded resulting in a yellow color cast (blue and yellow being antagonistic colors) as can be seen from the lack of information in the upper regions of the histogram. Black point was not adjusted for the blue channel since doing so would mean discarding information, causing loss of shadow detail. White point was reset to a value of 201. This provided an improvement in contrast and also result in an increase in the brightness level of the blue channel, going a long way to offset the yellow color cast of the photo.

photoshop levels rgb colorThe channel is now set to RBG which allows all three channels to be modified simultaneously. This is done so that gamma can be adjusted for the image as a whole, without impacting the corrected color balance. The gamma slider is offset to the left, giving a value of 1.08 to brighten the image. If the image was already too bright, a value of less than 1.00 could instead be used.

photo after levels adjustmentThis is how the photo appears after only the levels adjustment layer has been applied. In comparison to the original above, it is apparent that contrast is improved and that much, but not all of the color cast has been removed. The image still has a somewhat yellowish tint. Some fine tuning of color will therefore be needed.

photoshop color balanceThe remaining color inaccuracies can be dealt with using a color balance adjustment layer. This feature allows the overall color of a photo to be adjusted subtle or drastically as need dictates. If, however, levels have previously been correctly set, nothing more than modest changes will be required here in most cases. Colors can be adjusted with aid of the sliders in the color balance dialog box to the left. Color values for shadows, midtones and highlights can all be modified independently of each other. In this example, The level of blue was increased for midtones and highlights to nullify the yellow bias of the photo.

photo color adjustmentThe image after the color balance layer has been applied. The yellow tint is gone from the photograph, yet the overall color is still flat and dull. A final layer will be applied to amend this.

photoshop hue saturationIn the hue/saturation dialog box, saturation can be increased to make colors more vivid. This is sometimes needed for photos which have faded or which have lost saturation during the scanning process. This step is not always required and even when it is, care should be taken not to over-saturate and image or results will be unrealistic when printed. Although a slider is provided for lightness, it is my opinion that this adjustment is better implemented using the levels controls.

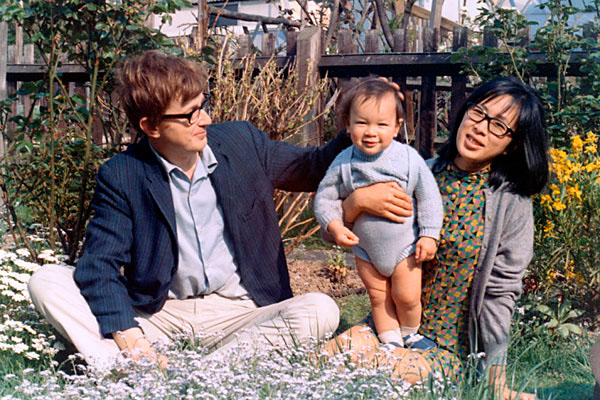
photo saturation adjustmentThe final image after all editing has been completed. Photos which are more badly faded or discolored can also be repaired using the techniques in this tutorial, and surprisingly good results may be obtained, even with very poor quality originals. The picture is now ready to be sharpened and printed.

Below are large images of the example photograph both before and after editing. Unsharp mask has been applied to the after image.

original photo before

levels adjustment after


All text and images © Copyright Alex Leveson. All rights reserved.
Site Map